Dry Erase Drawings: Tips and Tricks for Whiteboards
Most people only use dry erase markers to scribble a few words here or there on a whiteboard. At Ink Factory, the whiteboard is a huge part of our day-to-day. In fact, we have over 500 square feet of whiteboards in our studio that we can cover with dry erase drawings!

We’ve talked about ways to maximize your office’s whiteboard, but how about becoming an expert at dry erase drawings? Here are some helpful tips and tricks to help boost your dry-erase drawing abilities.
Supplies
First off, check your markers to make sure they are not dried up. When markers are dry, it they become very hard to use and the ink is harder to see. We recommend stocking up on lots of fresh markers. Black is the most often used, so make sure to double or triple up on your black marker inventory. We also like to reduce waste by using refillable dry-erase markers.
There are different types of marker tips for dry-erase markers. They are typically chisel-tip markers, but some also come as bullet tips. Here is the difference between the two:
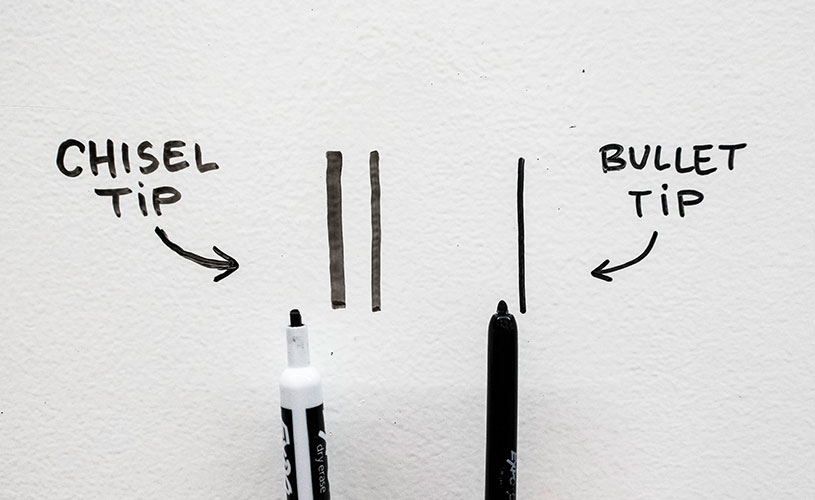
Chisel tips are great to use because they are actually two tips in one! The fatter side lets you draw a thicker line, while the thinner side gives you a skinnier line. Your writing will look cleanest if you chose one side and stick with it as you write. That makes your letters more consistent.
Bullet tips only have one line width, so you do not have to worry about the angle you are holding a bullet tip at. They are less common for dry erase markers, but provide a very even line and are great to take advantage of if you have some! Generally, bullet tips are better to use for writing or outlining instead of coloring because of the width of the tip.

The Visual Thinking Sketchbook
Handwriting Practice for Dry Erase Drawings
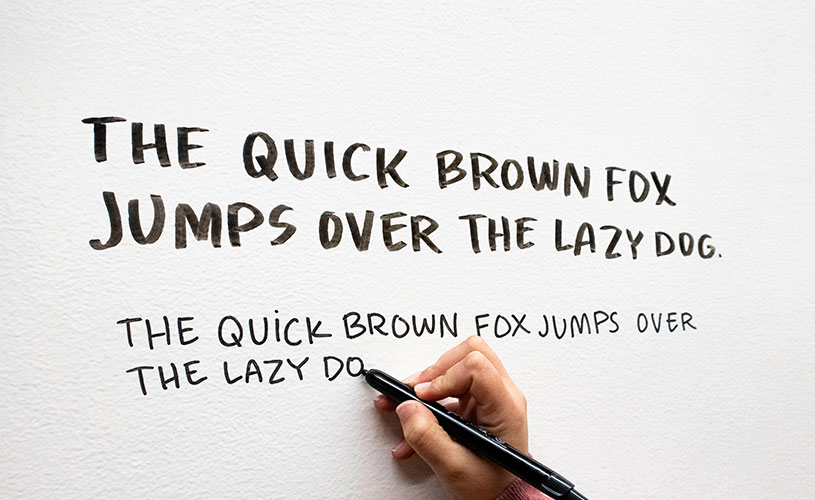
It helps to practice your handwriting using dry erase markers. The markers themselves feel different writing with a pen or pencil. The surface you are writing on is also very different since it will be vertical instead of on a table or other horizontal writing surface.
It also helps to practice because most of the time other people are going to be reading what you write down. It’s okay to give yourself a little bit of extra time as you write to make sure that your handwriting is legible. You will also be writing a bit larger than you are used to, so we recommend practicing writing letters about 1-inch tall or more.
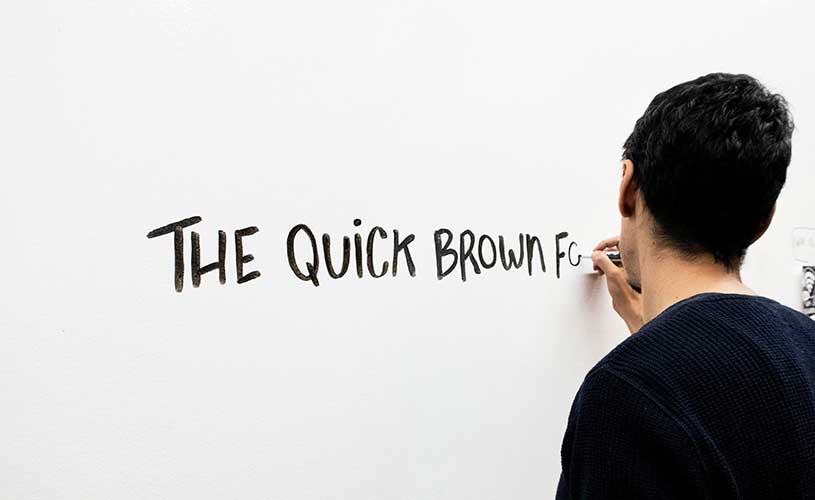
If you are writing down notes during a meeting on a whiteboard, try to focus on writing down only the main points and not necessarily every word. As you filter out information in your head, it gives you more time to focus on making a few words really easy to read instead of quickly scribbling down as many words as possible. You can also find some tips on note-taking here.
Erasing Dry Erase Marker Ink
One of the best features of dry-erase markers is the erasing! Once dry, the ink wipes off very cleanly. You can use this to your advantage. Some great erasing tools include your finger, a pencil eraser, or a microfiber cloth. Once you have let the ink dry on the drawing surface, use one of these tools to help straighten a line, clean up edges on a shape, or even write on top of a solid color. Just make sure to let the ink dry– wet ink smudges if you wipe it too early. To help the ink dry, simply blow air onto it – it should dry almost instantly!
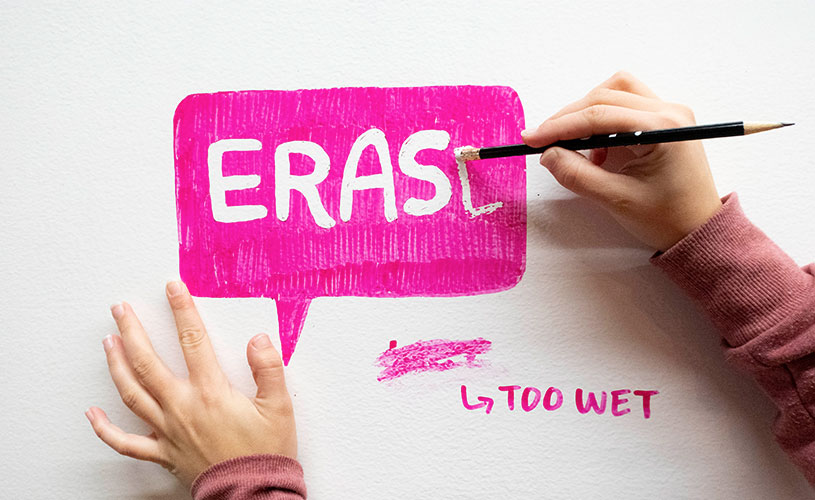
This also means that the ink can be easily erased on accident. Someone leaning up against the board or your hand resting on a drawn image may wipe off part of your hard work. One way to avoid this is by using your pinky to stabilize your hand while drawing on the board instead of using your whole hand. That will make the amount of board you need to touch while drawing much smaller and help prevent wiping off your other content.
Coloring Tips
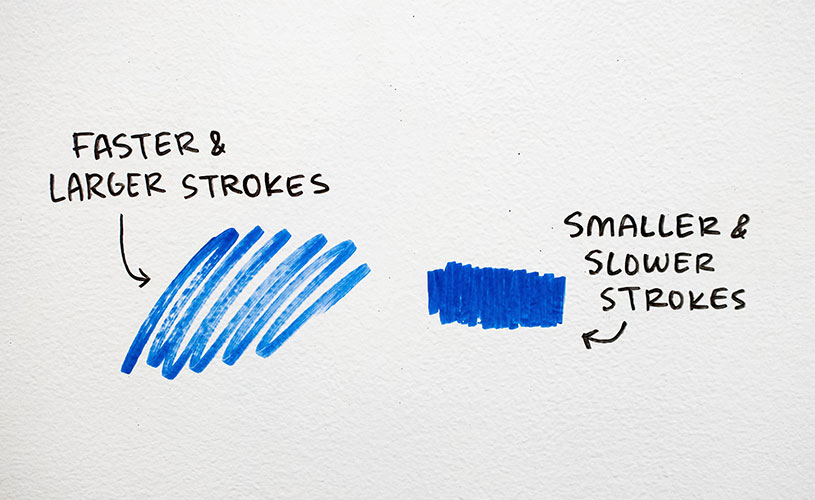
Dry erase markers feel different than normal markers when you are trying to cover a larger surface. Have you ever tried to color with a dry-erase marker and it just ends up erasing itself as you go? That can get pretty frustrating. Here are some tips to get the most out of your marker as you cover a larger area:
- Take it slow. If you try to cover a large area really quickly, the marker’s ink can’t keep up. Go a little slower and more deliberate than usual. This will help you get a fuller color.
- Go smaller with lines. While you’re coloring in slowly, you can also cover more space if you work smaller than usual. It may seem counter-intuitive, but smaller lines also help use the dry-erase ink to the fullest.
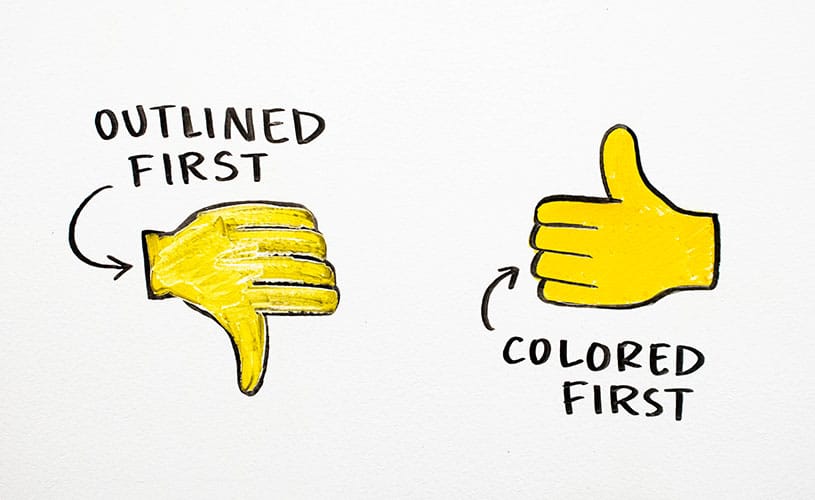
Another helpful trick is to start off with the color and finish with the outline of shape as opposed to the other way around. This is especially true if it’s a light color with a black outline. Even if the ink dries, it still is very easy to erase or mix in if lighter colors touch it.
If you need to draw your image first before starting to color, you can do this with pencil. Yes, you can draw right on the board! Pencil will erase easily with the same spray that takes off the marker. Draw very lightly with pencil, color in with your chosen color, and then draw over your outline with black, and there is a clean, colored image!
These are a few ways to make you a dry erase marker expert! If you want to learn more about making the most out of the whiteboards in your office, attend one of our visual note-taking workshops!
Wait, there’s more! Subscribe to the Ink Factory newsletter to learn the latest on visual trends.
With a community of 4,000+ visual thinkers, you’ll be in good company. Join us!